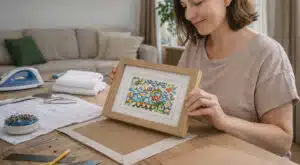
After spending several hours on making cross stitch,finally you have a finished cross stitch project in your hand. It is time to frame it for gifting or display.
But framing is a very important process which truly transforms stitched fabric into a display-worthy piece of art.
Whether the goal is your personal decoration or gift giving, proper framing protects the work, enhances its appearance, and significantly increases its perceived value.
Here we’ve got you covered with both the right cross stitch framing supplies and knowledge. In this article,the expert tips below will show you how to frame cross stitch properly and make it look good even on your first cross stitch framing attempt.
What You Will Use to Frame Your Cross Stitch
First things first, gather the right tools and supplies. Here is a list of what you will need to have your cross stitch work in frame. You can buy the materials at a craft shop or order online.
- The finished cross stitch piece
- A frame
- Foam core board (1/8 or 1/4 inch in thickness)
- Masking tape
- Craft paper
- Double-sided tape or hot glue gun
- Picture hanger
- Ruler
- Erasable fabric pen
- Scissors
- Straight pins (for pinning)
- Clips, heavy thread, cross stitch needle (for lacing)
Whenever possible, choose acid-free and lignin-free components. Inferior materials can cause yellowing, brittleness, or staining over time.
DIY Cross Stitch Framing: Steps to Follow
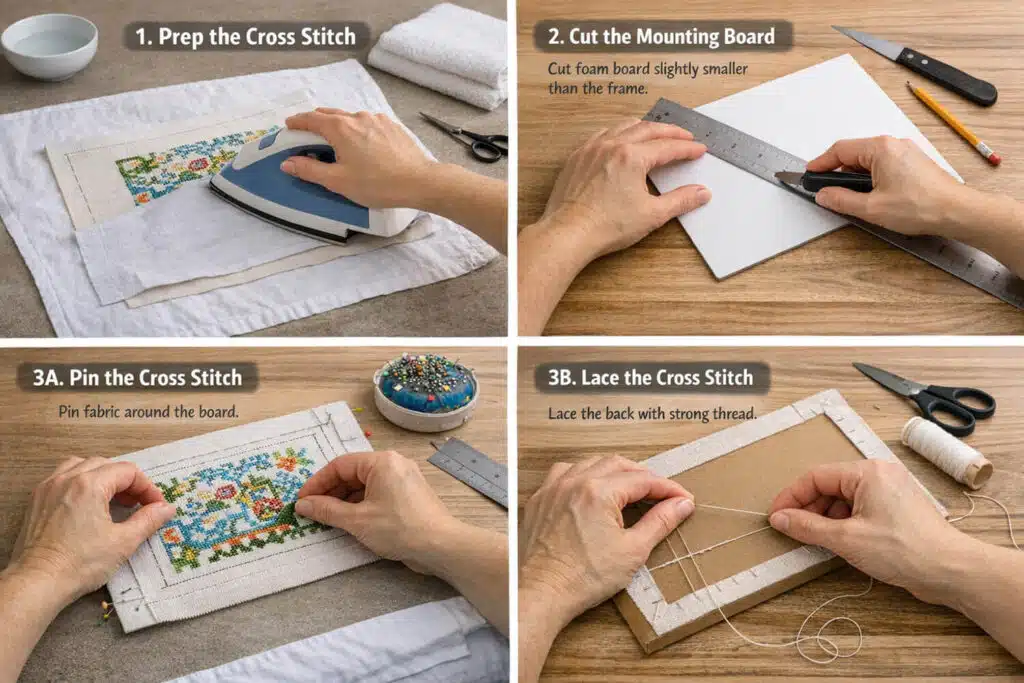
1. Prepare the Cross Stitch for Framing
In order to frame and display a clean and smooth cross stitch.,Here’s what to do to get your cross stitch piece ready for framing.
- Gently hand wash the cross stitched piece. Use cold water and mild detergent or soap.
- Rinse it and roll it in a towel to remove excess water. Do not wring.
- Lay it flat on a white towel and let it air dry.
- Smooth it by dry ironing it on the back side on low setting. (Do not use steam). Put a towel between the iron and the cross stitch. Direct heat can flatten or burn the stitches.
- If your work has excess material, trim it away, leaving at least 1 to 2 inches of margin on all sides.
2. Prepare the Mounting Board
Prepare the backing board that you will be mounting your cross stitch project onto. Cut out your foam board to a size smaller than the opening on your frame.
This will ensure it will fit in the frame snugly, even with the cross stitch fabric mounted and the excess fabric taped, pinned or laced.
Insert the board cutout into the frame to make sure it will fit. Make any necessary adjustment for the board to fit inside the frame as required.
3. Mount the Cross Stitch onto the Board
The next step is to mount the finished cross stitch work onto the backing board. There are different ways to do this:
Option 1: Frame Cross Stitch by Pinning
Pinning is the most popular way to frame cross stitch. It’s how professional framers do it and it’s also the easiest for beginners to DIY frame cross stitch. And how about the results? A neat framed piece that you can showcase even without a frame. Here’s is what to do when pinning:
- Align the center of your project with the center of the board and put a pin through.
- Stretch the fabric across the board while being careful to keep the tension even.
- Flip the board and fold the longer edges of excess fabric onto the back of the board. Start in the center of each edge and pin outwards towards the corners. Keep the fabric taut as you pin but don’t pull too hard.
- Fold the shorter edges and pin away starting in the center of each edge and pinning towards the corners.
- Fold the corners to lie as flat as possible and secure them with tape.
You can click the video on how to frame cross stitch by pinning.
Option 2: Frame Cross Stitch by Lacing
Suggest for lacing if your cross stitch piece doesn’t have plenty of leftover fabric to fold over the edges. It’s also great for larger pieces that need a more secure hold than pins provide. It yields a more secure hold than pinning and the end result has a flat look and feel. Lacing is done as follows:
- Match the center points of the fabric and board and push a pin through.
- Stretch the project across the board and use clips to hold the fabric at the edges
- Using a needle and strong thread, lace your project at the back of the mounting board. Stitch in a zigzag pattern, from one side to the other, and from top to bottom.
- Pull the thread taut to keep the stitches secure but not so tight as to distort your project.
- Avoid needling too close to the edge to prevent tearing your project.
Regarding frame cross stitch by lacing,you can click this video for reference.
Option 3: Frame Cross Stitch on Self-Adhesive Mounting Board
The easiest and fastest way to frame cross stitch at home is to lay it on a sticky board. This is a self-stick mounting board that comes with adhesive already placed on it. Simply press your project on the board, taking care to center and align it as well as you can.
4. Put the Mounted Cross Stitch in Frame and Assemble the Frame
You’re now on the final step: putting the mounting board with the project into the frame.
First, check it’s the right way around and that the design is lined up properly and straight. You can carefully massage or wiggle it around to fix any issue.
Place your mounted cross stitch piece into the frame. Double check on the front to make sure that everything is in order.
Seal the back of the frame by taping or gluing the craft paper to the back. This will protect your project from dust.
Put a hanger to the back of the frame. Your cross stitch project is now framed and ready to gift of display.
The Dos and Don’ts of Cross Stitch Framing
Are you concerned about achieving perfect results when framing cross stitch work? Here are some tips to keep in mind so you can avoid common issues and keep your framed work at its best for years to come.
- Always use acid-free board and tape. This keeps your cross stitch project from turning yellow as time passes.
- When pinning, use rust-proof pins that won’t ruin your work with rust stains.
- Take care to apply gentle and consistent tension as you pin or lace. Keep flipping your piece over to make sure it’s still well aligned.
- Want to frame cross stitch with glass? Use matting or spacers to prevent the glass from squishing your stitches.
- Store or display your framed cross stitch away from direct sunlight. This will keep it from fading.
- Do you intend to display the cross stitch in a place with high humidity? Ensure the frame is well sealed to keep away moisture.
FAQ s About Framing Cross Stitch at Home
1.What Method of Framing Cross Stitch is Best?
For the best way to frame cross stitch for beginners, pinning wins. It works great where there is plenty of fabric on the borders of the cross stitch pattern.
Lacing is the more preferred way of framing large cross piece projects and pieces without a lot of leftover fabric on the edges.
2.To Frame Cross Stitch With or Without Glass?
Framing cross stitch without glass allows the beauty and texture of the cross stitch pattern to show well. Framing with glass, on the other hand, is a great way to protect your cross stitch work from dust, moisture, and other elements.
If you opt to frame cross stitch with glass, choose a deep frame or use a shadowbox. Also, pick a frame with a mount in or use a mat or spacers between the glass and the cross stitch. This will keep the glass from crushing the stitches and your pattern will stay popped.
3.Any other Techniques for Framing Cross Stitch?
Besides pinning, lacing, or sticking on self adhesive board, you can also frame your cross stitch piece in an embroidery hoop. Another frame cross stitch idea is to make it into a pillow.
Conclusion
After reading this article, you can create beautiful cross stitch works by yourself for personal display or small-scale sales at home.
For larger production needs, professional manufacturing solutions is still needed.
Are you looking for experienced Craft Kit Manufacturer for your brand?
Whether you are a retailer, distributor, brand owner, professional manufacturing partnerships can streamline product development and reduce operational risk.We Jabay are the good choice for you to consider.
Please contact us to request catalogs, samples, or quotations for your cross stitch projects.